Piggy scarf
As I'd mentioned earlier, I decided to do the piggy scarf after being unsatisfied with the final material of my earlier scarf. The piggy was so adorable that I just had to make it! When I was done I was almost tempted to keep him for myself.
This is my first pattern. So, if something doesn't work out, please ask. Feel free to point out any mistakes that you find.
The pattern is listed below:
Craft: Crochet
Level: Beginner/Easy
Materials:
1 skein of light pink 8-ply wool
A little bit of darker pink
button/safety eyes for the eyes
5 mm crochet hook
tapestry needle
Note: You can use any weight of wool/yarn as you like. Local shops here do not really know the different types and stock them mostly as 4-ply/8-ply etc.
Stitches/Abbreviations used:
Stitch (st)
Single crochet (sc)
Half double crochet (hdc)
Crocheting in the round
Decrease/Stitch together (tog)
Fasten off (FO)
 |
| My completed scarf |
The pattern is listed below:
Level: Beginner/Easy
Materials:
1 skein of light pink 8-ply wool
A little bit of darker pink
button/safety eyes for the eyes
5 mm crochet hook
tapestry needle
Note: You can use any weight of wool/yarn as you like. Local shops here do not really know the different types and stock them mostly as 4-ply/8-ply etc.
Stitches/Abbreviations used:
Stitch (st)
Single crochet (sc)
Half double crochet (hdc)
Crocheting in the round
Decrease/Stitch together (tog)
Fasten off (FO)
Gauge: Gauge is not important in this pattern we can adjust the length of the feet accordingly at the end. The length is determined by the number of rows that you crochet. Decide for yourself what length you want your own scarf to be.
Pattern
We start from the base of the face and continue in one piece till we split the body at the end for the legs.
Face/Body
To begin: Chain 6
Row 1: sc in 2nd ch from hook, sc in ea of next 3 chs, ch 1 and turn (5st)
Row 2: 2 sc in 1 st, sc in next 3, 2 sc in last st, ch1 and turn (7st)
Row 3: 2 sc in 1 st, sc in next 5, 2 sc in last st, ch1 and turn (9st)
Row 4: 2 sc in 1 st, sc in next 7, 2 sc in last st, ch1 and turn (11st)
Row 5: 2 sc in 1 st, sc in next 9, 2 sc in last st, ch1 and turn (13st)
Row 6: 2 sc in 1 st, sc in next 11, 2 sc in last st, ch1 and turn (15st)
Row 7: sc in each st across, ch1 and turn (15st)
Row 8-18: sc in each st across, ch2 and turn (15st)
Row 19: hdc in each sc across, ch2 and turn (15st)
Repeat Row 19 till the scarf just about reaches the desired length and you are ready to make the feet.
Row x: hdc in each sc across, ch1 and turn (15st)
Feet
For the first foot: Continue on the body of the scarf already made
Row x1: sc in 5st across, ch1 and turn (5st)
Row x2-x9: sc in 5st across, ch1 and turn (5st)
Row x10: sc in 3 st across, sc next 2tog , ch1 and turn (4st)
Row x11: sc in 2 st across, sc next 2tog, ch1 and turn (3st)
Row x12: sc in 1 st across, sc next 2tog, FO (2st)
For the second foot:
Start on Row x and skip 5st after the first foot. Start on the 6th st.
Alternatively, you can count 5sts from the other end of Row x and start at the 5th st.
Note: make sure you start on the same side you did the first foot so that the feet are symmetrical.
Row x1: sc in 5st across, ch1 and turn (5st)
Row x2-x9: sc in 5st across, ch1 and turn (5st)
Row x10: sc in 3 st across, sc next 2tog , ch1 and turn (4st)
Row x11: sc in 2 st across, sc next 2tog, ch1 and turn (3st)
Row x12: sc in 1 st across, sc next 2tog, FO (2st)
Ears - make 2
To begin: Chain 6
Row 1: sc in 2nd ch from hook, sc in ea of next 4ch, ch1 and turn (5st)
Row 2-3: sc in 5st across, ch1 and turn (5st)
Row 4: sc in 3sc across, sc next 2tog , ch1 and turn (4sc)
Row 5: sc in 2st across, sc next 2tog, ch1 and turn (3st)
Row 6: sc in 1st across, sc next 2tog, ch1 and turn (2s1)
Row 7: sc next 2tog, FO (1st)
Snout
To begin: Chain 5
Round 1: sc in 2nd ch from hook, sc in ea of next 3ch, sc again in last ch and work in the back ridge of your foundation chain, 4sc across, sc again in last back ridge. (10st)
Round 2: 2 sc in each st (20 st)
Round 3: *2 sc in 1 st, 1 sc in next st*, continue from *to * till last st, FO (30 st)
Attach all the pieces using the tapestry needle, taking care that the snout starts from the lower part of the face where the face is almost done widening. I hope the picture helps demonstrate what I mean.
Use the light pink to add the 2 lines for the nostril. Can be done either before joining pieces or while joining pieces.
The ears can be placed last. Align them with the eyes.
Hope this makes sense!
Please tell me how you like it by leaving a comment!
Thanks.
Update: I added more pictures, including a close up of the face for placement.
 |
| How the bottom looks when worn |
We start from the base of the face and continue in one piece till we split the body at the end for the legs.
Face/Body
To begin: Chain 6
Row 1: sc in 2nd ch from hook, sc in ea of next 3 chs, ch 1 and turn (5st)
Row 2: 2 sc in 1 st, sc in next 3, 2 sc in last st, ch1 and turn (7st)
Row 3: 2 sc in 1 st, sc in next 5, 2 sc in last st, ch1 and turn (9st)
Row 4: 2 sc in 1 st, sc in next 7, 2 sc in last st, ch1 and turn (11st)
Row 5: 2 sc in 1 st, sc in next 9, 2 sc in last st, ch1 and turn (13st)
Row 6: 2 sc in 1 st, sc in next 11, 2 sc in last st, ch1 and turn (15st)
Row 7: sc in each st across, ch1 and turn (15st)
Row 8-18: sc in each st across, ch2 and turn (15st)
Row 19: hdc in each sc across, ch2 and turn (15st)
Repeat Row 19 till the scarf just about reaches the desired length and you are ready to make the feet.
Row x: hdc in each sc across, ch1 and turn (15st)
Feet
For the first foot: Continue on the body of the scarf already made
Row x1: sc in 5st across, ch1 and turn (5st)
Row x2-x9: sc in 5st across, ch1 and turn (5st)
Row x10: sc in 3 st across, sc next 2tog , ch1 and turn (4st)
Row x11: sc in 2 st across, sc next 2tog, ch1 and turn (3st)
Row x12: sc in 1 st across, sc next 2tog, FO (2st)
For the second foot:
Start on Row x and skip 5st after the first foot. Start on the 6th st.
Alternatively, you can count 5sts from the other end of Row x and start at the 5th st.
Note: make sure you start on the same side you did the first foot so that the feet are symmetrical.
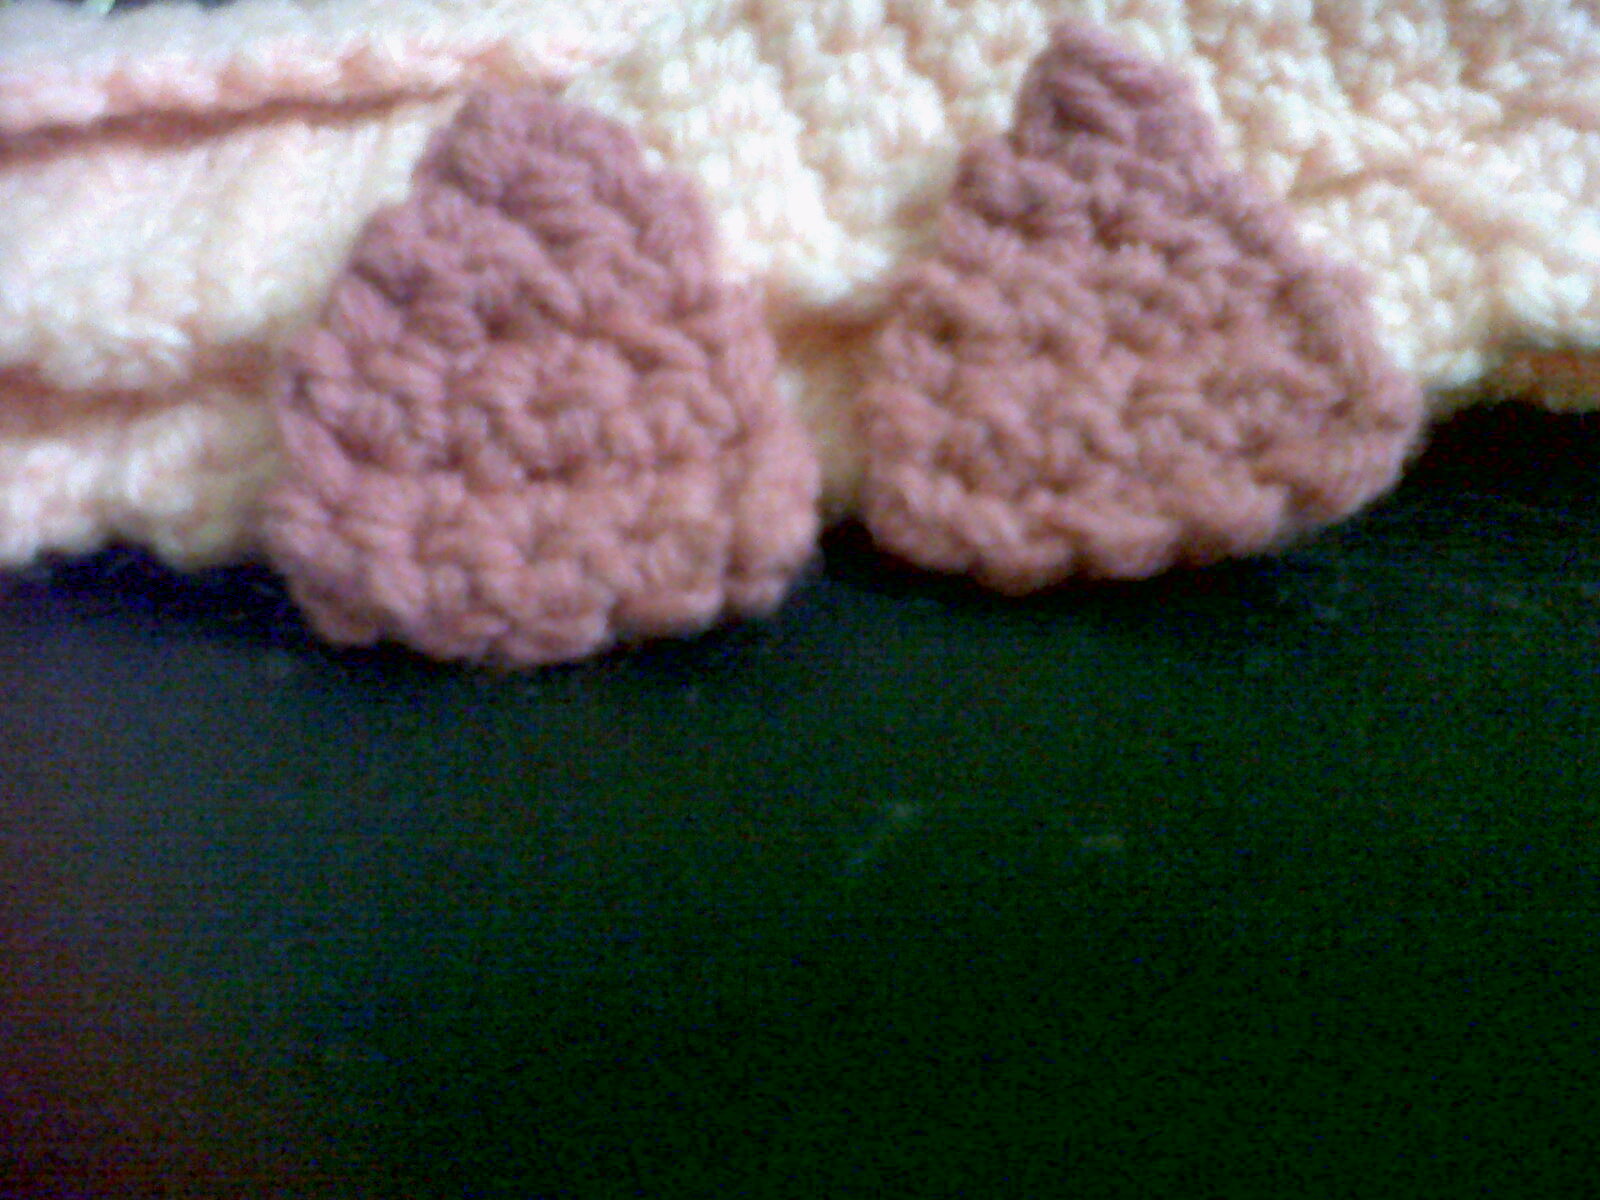 |
| the ears |
Row x2-x9: sc in 5st across, ch1 and turn (5st)
Row x10: sc in 3 st across, sc next 2tog , ch1 and turn (4st)
Row x11: sc in 2 st across, sc next 2tog, ch1 and turn (3st)
Row x12: sc in 1 st across, sc next 2tog, FO (2st)
Ears - make 2
To begin: Chain 6
Row 1: sc in 2nd ch from hook, sc in ea of next 4ch, ch1 and turn (5st)
Row 2-3: sc in 5st across, ch1 and turn (5st)
Row 4: sc in 3sc across, sc next 2tog , ch1 and turn (4sc)
Row 5: sc in 2st across, sc next 2tog, ch1 and turn (3st)
Row 6: sc in 1st across, sc next 2tog, ch1 and turn (2s1)
Row 7: sc next 2tog, FO (1st)
 |
| the face before attaching the ears |
To begin: Chain 5
Round 1: sc in 2nd ch from hook, sc in ea of next 3ch, sc again in last ch and work in the back ridge of your foundation chain, 4sc across, sc again in last back ridge. (10st)
Round 2: 2 sc in each st (20 st)
Round 3: *2 sc in 1 st, 1 sc in next st*, continue from *to * till last st, FO (30 st)
Attach all the pieces using the tapestry needle, taking care that the snout starts from the lower part of the face where the face is almost done widening. I hope the picture helps demonstrate what I mean.
 |
| Figuring out the placement for the ears |
Use the light pink to add the 2 lines for the nostril. Can be done either before joining pieces or while joining pieces.
The ears can be placed last. Align them with the eyes.
Hope this makes sense!
Please tell me how you like it by leaving a comment!
Thanks.
Update: I added more pictures, including a close up of the face for placement.


this has to be one of the cutest piggies I've seen and even cuter in scarf form. thank you for sharing this pattern. wishing you the best in your sabbatical. :)
ReplyDeleteSo cute!
ReplyDeleteThank you!
ReplyDeleteGorgeous! Just what I needed when a little girl begged me to make her a pink scarf.
ReplyDeleteThanks a bunch! :)
Amazing I just love Pigs...so I am defiantly going to be trying this pattern out...
ReplyDeleteI love this so much! Featured today on Moogly! http://www.mooglyblog.com/crochet-animal-scarf-patterns/
ReplyDelete